The Older interface is more advanced and is designed to look more like popular web-based email providers. It introduces more advanced email functions to children aged 7-11.
Layout
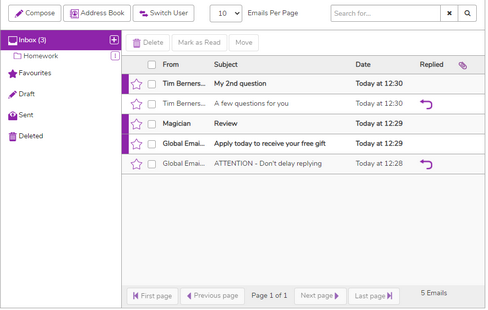
Opening 2Email will automatically take children to the Inbox. They will find five folders to explore: the Inbox (with sub-folders, if they have been created), Favourites, Drafts, Sent and the Deleted. Depending on the 2Email Settings, the Inbox contains all emails they have received, both from 2Respond and from classmates or teachers. The Favourites folder contains emails flagged as Favourites using the star beside each email. The Draft folder holds any emails which have been created but not sent. The Sent folder holds all the emails that have already been sent, and the Deleted folder shows all emails which have been deleted.
![]() Clicking here will create and open a new blank email, and is one way to write an email.
Clicking here will create and open a new blank email, and is one way to write an email.
![]() Clicking here will open the user's address book.
Clicking here will open the user's address book.
![]() Switching users allows users to access the Inbox of one of the Purple Mash Practice Users, send messages as these users and reply to messages.
Switching users allows users to access the Inbox of one of the Purple Mash Practice Users, send messages as these users and reply to messages.
The 'Email per page' drop-down menu lets users choose how many items they want to see per page. The default setting is 10 but it can be changed to 25 or 75.
The search bar is used to find emails by the name of the sender or words in the subject line, which makes finding a specific email easier. The search filters emails shown in all folders, and can be cleared by deleting the contents of the field or by clicking the "x" to the right of the bar. If you find that none or not all of your emails are showing, make sure that this field has been cleared.
Selecting any folder will open it, allowing users to look at the emails it contains. Where a number is shown in brackets after the folder name, this indicates the number of unread emails in that folder.
![]() The plus icon adds sub-folders to an Inbox. This helps with organising mail.
The plus icon adds sub-folders to an Inbox. This helps with organising mail.
![]() The kebab menu allows users to create a sub-folder within a sub-folder, rename the sub-folder or delete the sub-folder.
The kebab menu allows users to create a sub-folder within a sub-folder, rename the sub-folder or delete the sub-folder.
Selecting an email from the list will open the email. The star on the left hand side of an email can be used to toggle the email as a Favourite. Once an email is starred, it will appear both in the Inbox and in the Favourites, making it easier to find.
![]() This shows that a message has been replied to.
This shows that a message has been replied to.
If there are more emails in the folder than can be shown on the page, the buttons at the bottom can be used to navigate between the different pages. This footer also shows the total number of emails in the current folder.
Address Book
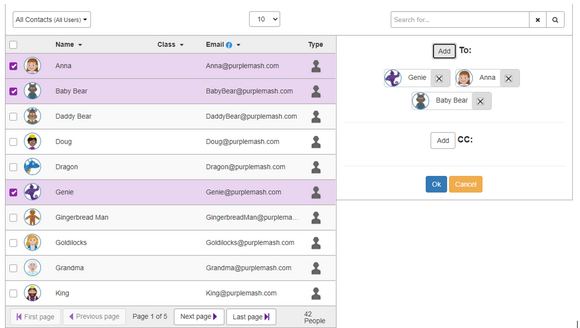
When the Address Book is clicked the following view should be visible:
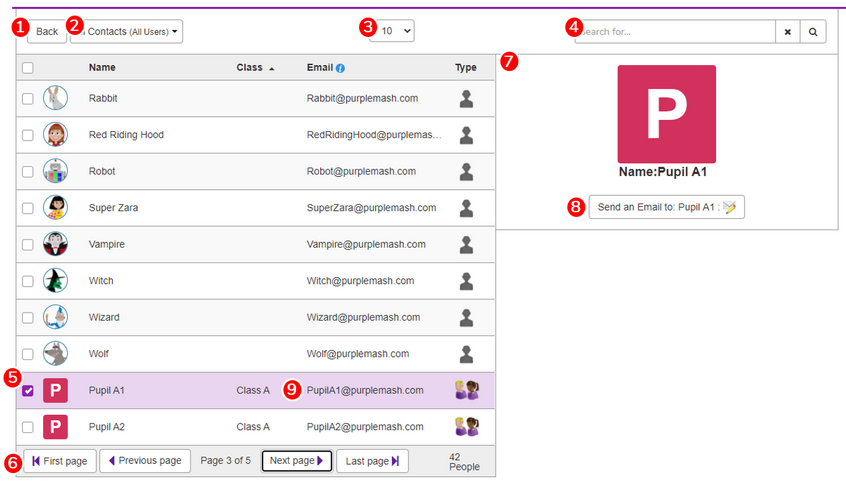
| 1. | Click here to go back to the Inbox. |
| 2. | Choose which group of contacts to view from this drop-down menu. Depending on the 2Email Settings, these include the Purple Mash Practice Users and other users from the child's class or group. |
| 3. | Use this drop-down menu to decide how many contacts to view on one page. 10 is the default but this can be changes to 25 or 75. |
| 4. | Search for contacts here using their name or email address. |
| 5. | Select a contact from this list to see their details. |
| 6. | Use these buttons to navigate between pages of contacts. |
| 7. | When a contact is selected, their picture and other details will appear here. If the contact is another child, then the image shown will be their Avatar. |
| 8. | Pressing this button is one way to write an email. |
| 9. | Email addresses are pseudo email addresses and are generated by 2Email to give a more realistic emailing experience for children. |
How to create a new message
There are two ways to send a new email.
| 1. | Selecting the Compose button in the 2Email header will create and open a blank message where children select recipients from their Address Book in the To field or in the CC field, write a Subject line, and a Message. |

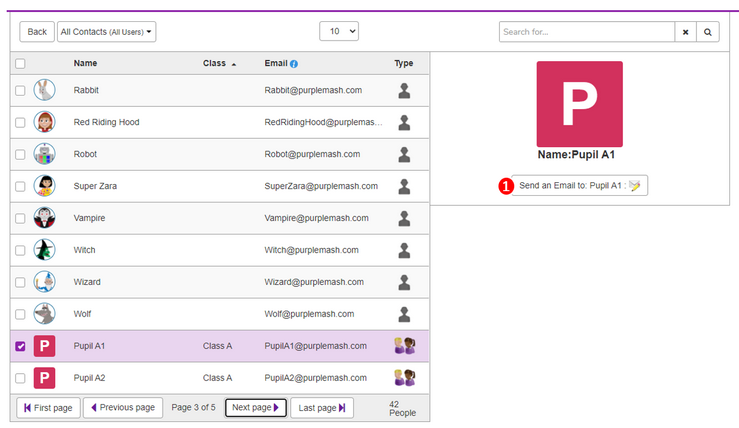
| 2. | Selecting someone from the Address Book and clicking on the "Send an Email to" button will create and open a new message, with the "To" field already populated, and children will write a Subject and a Message. More recipients can be added to both the "To" field or in the "CC" field manually. |
Email fields

| 1. | This field is automatically populated with the sender's name. It cannot be changed. |
| 2. | This is used to choose recipients from the Address Book. Emails can be sent to multiple recipients. To fill it, either select the Contacts icon which will open the address book screen allowing recipients to be chosen from the full list of contacts, or start typing the name of someone in the Address Book and select from the list of suggestions. Recipients will appear underneath this field, and can be removed by clicking the "X" to the right of the name. If you open the address book, you need to find your desired contact. Tick the box next to their name and then use the Add button to add them to "To" field. Select multiple contacts by ticking multiple boxes, or tick the "Select All" box to select all your contacts from a class or group. Pressing the x next to the contact's name will remove them from the "To" field. When you have selected the contact (or contacts) you want, press OK and they will be added to your email. Pressing Cancel will discard any changes made to the "To" or "CC" fields. |
| 3. | This field is used to choose recipients from the Address Book in the same way as the To field. Emails can be CC'd to multiple recipients. The recipients in this field will be able to see who the message was sent to and the names of the other recipients. The recipient in the To field will also be able to see the CC recipients. It works in the same way as the "To" field. |
| 4. | This field can contain words, letters, symbols, and Purple Mash emoticons. |
| 5. | This field can contain words, letters, symbols, and Purple Mash emoticons. |
| 6. | Emoticons can be added into an email just by clicking them. The emoticon bar will only show if you have clicked into the Subject line or the Message box. |
| 7. | Pressing Send will send the message. |
| 8. | Pressing the Save To Draft button will save the email into the Draft folder. It is not sent. The email will remain open on the screen, with the "Cancel" button now showing "Close", and it can still be changed before being saved to drafts again, or sent. Once the message has been sent, it will no longer appear in the Draft folder. |
| 9. | Attach activities, games, writing projects or paint projects that have been saved in Purple Mash to an email using the file picker. |
| 11. | Pressing Cancel will close and delete the email. A window will appear before the draft is deleted asking for confirmation that this is what the user wants to do. Navigating to any other folder (Inbox, Address Book, or Compose) will also bring up the warning reminding users that they will lose their draft work. |
Reading an email
Selecting an email from the Inbox will allow you to read the email and carry out related tasks.
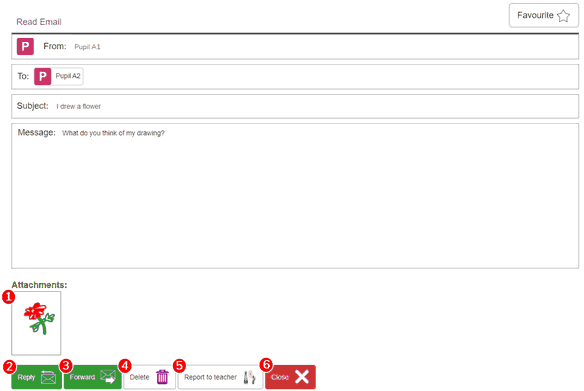
| 1. | This is an attachment sent by another child. |
| 2. | REPLY: After pressing Reply, the same options will appear as when writing a new message. The main difference will be that the original email text will be included at the bottom of the Message field, and the recipient will be the original sender. |
| 3. | FORWARD: This button is used to send this email to different recipient. The recipient will also receive the attachment. |
| 4. | DELETE: The Delete button will remove the email from a child's Inbox. This email will now be in the Deleted folder. Emails can be moved out of the Deleted folder back into the Inbox by dragging and dropping. |
| 5. | REPORT: If the child finds something offensive or wrong in the email, they can press this button to report it to their teacher. Once they press this button, the email will disappear from their folder. |
| 6. | CLOSE: Pressing Close take the child back to the Inbox without affecting the email. |
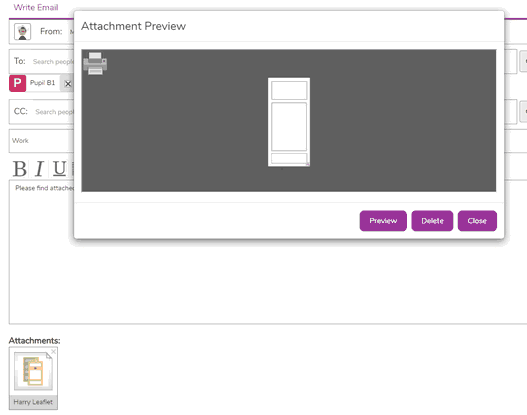
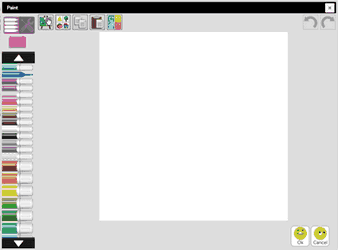
Viewing an attachment
When receiving an email with an attachment, it will appear at the bottom of the email. If it is an image that was drawn in 2Email, a small preview will appear at the bottom of the email. If it is a Purple Mash activity, the icon at the bottom of the email will either be a preview of the work, or the tool's icon if a preview is not available. If it is an external file, then clicking on it will download the file where it is then viewable outside of Purple Mash.